• Skip to primary navigation
  • Skip to main content

Pies & Prejudice

Adventures of a Geeky Pie Baker

  • About
  • My Geeky Pies

Geeky Pies

Carrot Pie with Maple & Cardamon: A Pie that’s Good for your Eyes!

February 7, 2018 by Pies & Prejudice 6 Comments

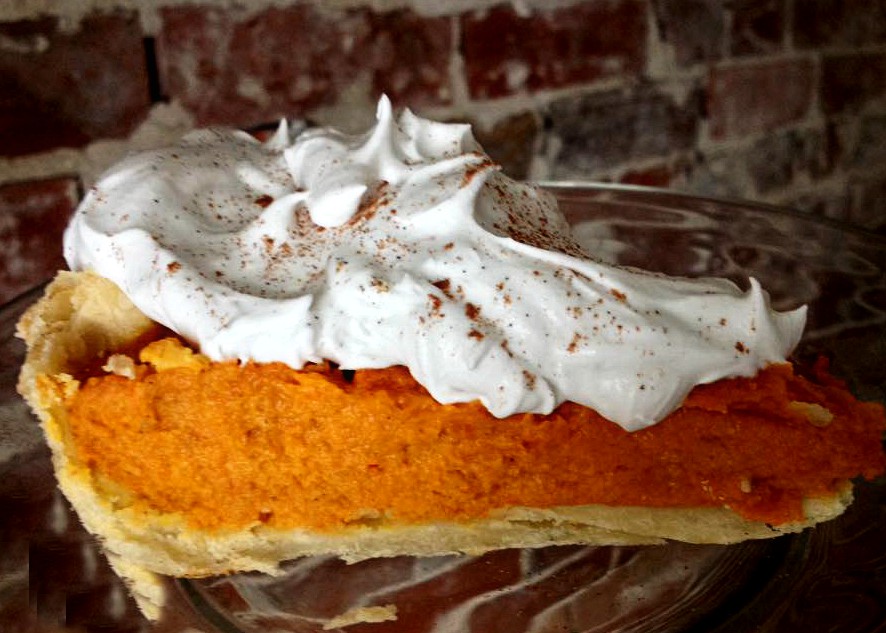
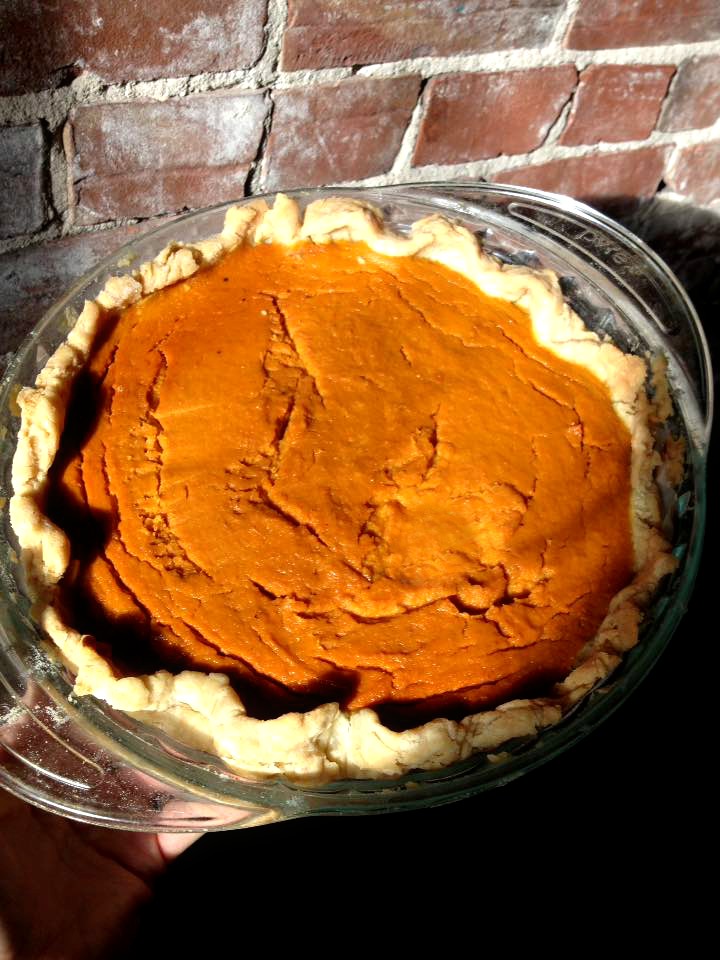
If you love pumpkin pie and its close cousin, ‘Sweet Potato’ Pie, I think you’ll loooove this yummy carrot pie. It’s creamy and lightly spiced with a touch of cardamom, maple syrup, and brown butter. Plus it’s healthy since it’s made with carrots. Which means you can have a couple of slices guilt-free–since your eyesight depends on it and all!

Most people love carrot cake. It’s one of the most popular desserts on any restaurant menu for good reason. But if you ask anyone if they want to try a Carrot Pie, they’ll probably look at you like you have 3 heads. It’s okay for a cake to be made with carrots, so why not a pie? Right?

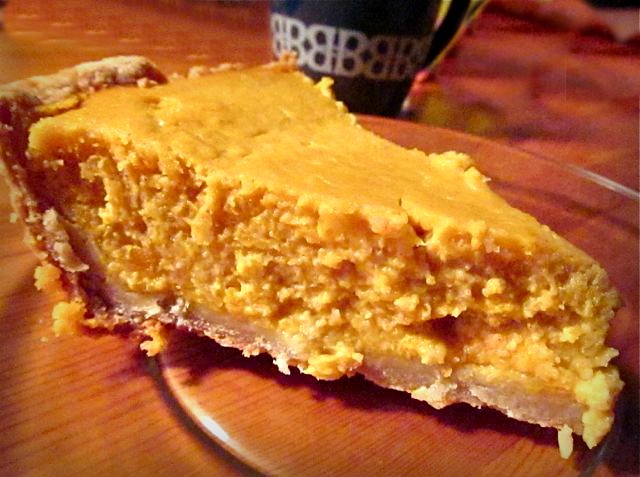
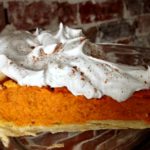
This Carrot Pie is sweeter than a pumpkin pie, but the key is roasting the carrots for the best flavour. Then you add some spices (cinnamon, cardamon and nutmeg), maple syrup, cream and brown butter–which takes it to the next level (doesn’t brown butter take everything to the next level?). Before serving, I topped each slice with some coconut whip and a light sprinkling of cinnamon & cardamom.

It’s so similar to pumpkin pie that you might be hard-pressed to tell the difference. Some of my friends (aka guinea pigs) didn’t even know it wasn’t pumpkin pie since it looks just like it and has a similar taste. But they knew it was slightly different from their ‘usual’ pumpkin pie.

I first made a Carrot Pie last year when my Aunt Colleen and I were chatting about pies, and she told me about all the unique pies she used to eat all the time when she was young (she’s in her 80s!), such as raisin pie, butterscotch pie and carrot pie. Since I’d never even heard of a carrot pie, I couldn’t wait to try it. Later on, I found a recipe in one of my mom’s old cookbooks which included a recipe for a carrot pie. I mostly followed the recipe (with a few minor changes) and then brought the pie over to her place so we could share a couple of slices along with a cup of tea.


We really enjoyed it, and we both thought it tasted very similar to pumpkin pie (maybe a wee bit sweeter), but I definitely still preferred the pumpkin.

Just recently, however, I decided to try another carrot pie but with a few more additions to the recipe that I’d found in the book and also online (there aren’t too many, and they are all fairly similar). It turned out fabulously! Instead of boiling the carrots and mashing them, as most of the recipes called for, I decided to roast them. I also added maple syrup, cinnamon and brown butter, and a couple of teaspoons of cardamom. Besides the carrot puree, I added a small scoop of pumpkin to give the filling a bit more texture. But if you don’t have any pureed fresh pumpkin or a can of pumpkin handy,  you can just leave it out. I had some leftover from my pumpkin dog treats and had just wanted to use it up. I was definitely more impressed with this version of a Carrot Pie. So yummy!

I’m sharing this carrot pie recipe today for the #24carrotgoals party– a Carrot Collaboration on Instagram that I’m a part of along with several other fabulous food bloggers & Instagrammers. If you’ve got a few bags of carrots sitting in the fridge and you’re looking to make a few new delicious appetizers, meals, or desserts with carrots (there’s a couple of great carrot cake recipes to try—but only after you make my carrot pie, of course! haha), you need to check these out. See the end of this post (below recipe) for the links to my fellow bloggers’ awesome carrot recipes, or search the hashtag #24carrotgoals on IG (or on one of the two links below) for dozens of fabulous carrot recipes. A huge thank you to Rebecca & Ruth of Square Meal Round Table & Annie of What Annie’s Eating for organizing this collaboration and also for including me :D. I can’t wait to check out all the awesome recipes!

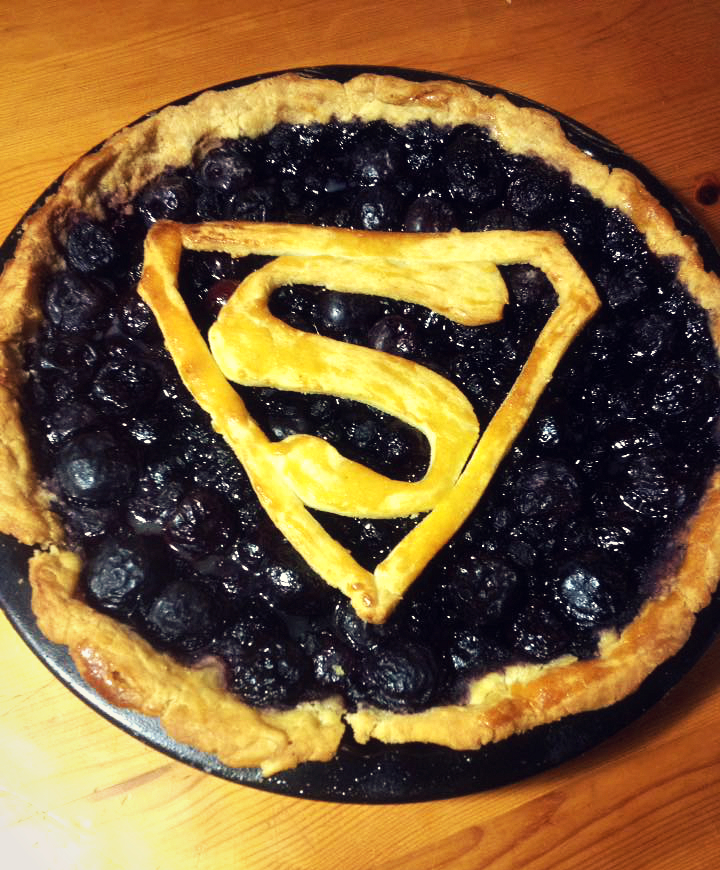
I hope you guys get a chance to make this Carrot Pie, and please let me know what you think if you do make it. Don’t eat it all at once though, or you may end up with Superman’s X-Ray Vision haha (See! you just knew I had to geek up this post somehow hehe).

Have a wonderful week, everyone!

Dana xo

Print

Carrot Pie with Maple & Cardamon

A delicious spiced cream pie made with freshly roasted carrots, maple syrup and cardamon

Ingredients

Ingredients

  • 1 partially baked blind-baked Pie shell (homemade or storebought)
  • Carrot Filling
  • 2 cups roasted & pureed carrots roasting isn't necessary but it adds lots of flavour
  • 1/3--1/2 cup fresh or canned pumpkin--(not pie filling_
  • 2 teaspoons cinnamon
  • 1/2 teaspoon fresh nutmeg
  • 1 to 2 teaspoons cardamon depending on how much you like this spice
  • 3/4 cup brown sugar (or coconut sugar)
  • 1/3 cup maple syrup
  • 1 tablespoon cornstarch
  • 2 egg yolks plus 1 egg
  • 3 Tablespoons brown butter or regular butter
  • 1/2 cup full-fat cream or coconut cream
  • 1 cup milk reg, almond, cashew, coconut
  • 1 teaspoons vanilla bean extract
  • pinch of sea salt and black pepper

Instructions

Instructions

  1. Roll out your favourite pie dough and put it into a 9" pie plate, or skip if using a store-bought pie crust. If you're making your own crust, after rolling out and placing in pie plate, place in freezer for at least half an hour before baking to reduce likelihood of shrinking. Then blind-bake the crust (without filling, and using pie weights) for about 20-30 minutes at 300F. This will help prevent a soggy bottom. Allow crust to cool completely before filling.

  2. For the best flavour, roast carrots (I use about 8-10 medium carrots) for the puree. Let cool slightly and then add the carrots to a large saucepan, along with pumpkin (if using), brown sugar, maple syrup, butter, spices and salt & pepper. Mix well and cook for a few minutes over medium heat just to combine.

  3. Add the mix to a blender and mix until fairly smooth. Then add cream, milk, and eggs. Blend at the lowest speed just to combine filling. You don't want to over-mix once you add the eggs and cream. Then add cornstarch and give it another quick whirl.

  4. Once the crust is cool, scoop the filling into the crust and place in the oven at 375F for about 10 minutes. Reduce heat to 350F and bake for another 40-50 minutes--or just until the middle is just slightly jiggly. It will cook for a bit longer after it's out of the oven. Cool at room temperature for an hour and then cover and refrigerate....preferably overnight--- but at least for a few hours. Enjoy with some whipped cream or coconut whip

Check out some of these other delicious carrot recipes from my fellow bloggers:

Square Meal Round Table’s Rainbow Carrot and Ricotta Tart

The Cooking of Joy’s Candied Carrot Rose Tart

Better with Biscuits’ Carrot Souffle

This Healthy Table’s Beet and Carrot Galette

Always Eat Dessert’s Carrot Cake Squares with Orange Glaze

Figs & Flour’s Thai Peanut Pizza

Fufu’s Kitchen’s Oven Baked Carrot Fries Drizzled with a Tahini Sauce

Flours in Your Hair’s Carrot Pecan Cookies

Hola Jalapeño’s Roasted Carrots with Chipotle-Honey Butter

Worth Pause’s Paleo Thai Curry Carrot Soup

Something New for Dinner’s Minted Sous Vide Carrots with Balsamic Vinegar and Goat Cheese

What Great Grandma Ate’s Paleo Carrot Mug Cake

More Icing Than Cake’s Spiced Quinoa & Roasted Carrot Salad

Hot Dishing It Out’s Vegan Carrot Whoopie Pies

Confetti Kitchen’s Harissa-Roasted Carrots with Lentils and Yogurt

Easy and Delish’s Carrot Spaghetti

Pie Girl Bakes’ Five Spice Carrot Bundt Cakes with Bourbon Cream Cheese Glaze

Smoothies and Sundaes’ Carrot Cake Sourdough

Zestful Kitchen’s Moroccan Stuffed Portobello Mushrooms

Food by Mars’ Paleo Carrot Walnut Loaf Cake

Cosette’s Kitchen’s Sumac Carrot and Feta Salad

Measuring Cups Optionals’ Carrot Curry Soup

Rezel Kealoha’s Turkish Yogurt Carrot Dip

Pies and Prejudice’s Carrot Pie with Maple & Cardamom

Amanda Skrip’s Rainbow Roasted Carrots with Citrus Fennel + Arugula

Baking The Goods’ Roasted Carrot & Herby Feta Galette

Marianne Cooks’ Carrot and Zucchini Mini Muffins with a Cinnamon Frosting

Rumbly in My Tumbly’s Chai Carrot Pie

Cook Til Delicious’ Mini Carrot Cake

What Annie’s Eating’s Roasted Carrots with Herby Carrot Top Salsa Verde

It’s a Veg World After All’s Zesty Sunflower Carrot Spirals


Filed Under: family, Food, Food Network, Geeky Pies, Writing

A Wedding Pie (not mine): Spiced Cherry

December 9, 2017 by Pies & Prejudice 14 Comments

Who needs a cake to celebrate your nuptials when you can have a WEDDING PIE? Especially if it’s a Spiced Cherry pie. Mnnnn…..

I made this pie for Darlene and Guy, who got married recently in their hometown of Dalhousie, New Brunswick. While visiting them there, I decided that they needed a wedding Pie. Plus, I was fairly desperate to get my bake on after several days on the road—without an oven in sight!! (the baking withdrawals are real, people!).

If you’re into pumpkin-spice-everything right now but you’re also missing summer fruit as much as I am, this is the perfect crossover pie. It’s a sweet cherry pie with a holiday twist. I’ve added cinnamon, fresh nutmeg, cardamon, brown butter, maple syrup and orange extract. I ran out of cherries while making this pie (I was travelling at the time and didn’t buy enough, oops!), so I added a few blackberries and blueberries to the mix. Super good! (recipe below post)

The wedding theme is optional, of course. But even without the bride and groom, I think you’ll like this pie.

If you look closely at the pie, you’ll notice the groom’s arm missing. After it came out of the oven, it needed to cool for a couple of hours. Unfortunately Guy had to work at 4am so he couldn’t wait to have the pie as it was getting late. Darlene didn’t want to cut into their wedding pie without him, but then she got hungry later and decided to bite a piece of his arm off (ha). The next morning she just told him a shark attacked the pie in the night. Considering there aren’t too many sharks in Northern New Brunswick, I don’t think he believed her. But it was a good attempt, anyway.

I hope you guys are doing great and having a fabulous fall so far! I’ve only been writing this post since I got back from my travels but then I got super busy with getting my baking biz up n’ running. How all my blog/foodie friends find the time to not only post on their blogs often, but also keep up with Instagram (and the comments!), facebook, twitter AND have time to recipe-test and bake is beyond me?? Teach me your ways, guys. Pleaseeeee?

Plus, I wasn’t sure how to keep my blog and business separate, so I decided to put this blog on a short hiatus. The problem was that many of my local homies were coming here looking for a menu and reviews of my treats. Instead, all they found were travel pics, food ramblings and recipes (ha ha). None of which helped them get their hands on a fresh Apple Pie whatsoever.

So, I’ve created a new Facebook page for my baking biz so that way I can keep this as my food/lifestyle blog and a place to share recipes, and anyone looking for treats can go to my Facebook page to see my menu and read reviews. That’s also where I can send event
organizers who are looking to see if I’d be a viable vendor for their craft fairs. I’ll be posting my new creations there regularly, as well as events and updates.

Speaking of craft fairs…I need your help, guys! I’m hoping to get into a couple of upcoming events so I’d love it if you could stop by to check out my new facebook page (don’t forget to like/follow, too). Thanks a bunch, I really appreciate it. 

I was also thinking of sharing my recent trip on here but then I remembered this is supposed to be a food blog, after all 😀 Plus my last few travel stories such as my Spring Road Trip and my Christmas holiday last year, didn’t get much traffic or feedback at all. So, I’ve decided to just keep my travel stories for when I meet friends over coffee or drinks (then they don’t have a choice–and can’t scroll either! haha) and just focus on my baking & recipes here. That also means my posts will be shorter (yay!). But don’t worry– I can talk a lot about food, too.

Hope you’re having a great start to the holidays! Let me know if you try this cherry pie, it’s one of my faves. I’m also sharing my latest holiday creation— White Chocolate Cream pie’– soon, too.  If you like white chocolate, I think you’ll love it. Stay tuned!

Happy Weekend, friends!

Love, Dana  xo


Print

Spiced Cherry Pie

Summer and Fall Flavours combined into one very tasty pie. Perfect for the holidays, too!

Course Pies, dessert, Holiday
Author Dana

Ingredients

For the Filling

  • 2 cups each cherries, blackberries and blueberries 6 cups total (or another mix of your choice)
  • 1 small apple grated
  • 2 teaspoons fresh lemon juice
  • 2 teaspoons cinnamon
  • 1/2 teaspoon fresh nutmeg
  • 1/2 teaspoon cardamon
  • 1/2 cup brown sugar
  • 1/3 cup maple syrup
  • 3 tablespoons tapioca starch (or cornstarch)
  • 1/4 brown butter or regular butter
  • 2 teaspoons vanilla bean extract or regular vanilla
  • pinch of sea salt
  • 1 tsp orange extract (optional)

Instructions

Instructions

  1. Roll out your favourite pie dough and put into a 9" pie plate, or skip if using a storebought unbaked pie crust.
  2. Place 2 cups of frozen cherries (or other fruit) and brown sugar in a saucepan and cook over medium heat until the cherries soften and they become saucy (I use a fork or potato masher to help break them down). The mixture should reduce by approximately a third to a half, usually in about 10 minutes or so. Allow to cool slightly. *While this is not a mandatory step, I always do this because it takes some of the 'water' out of the filling and adds a condensed sauce to the pie filling.
  3. Add brown butter, maple syrup (or reg/brown sugar), cinnamon, cardamon, nutmeg and salt to the cherry mix. Set aside to cool
  4. Grate apple and squeeze some of the moisture out with a cloth or paper towel. Add to the cherries
  5. Add the remaining 4 cups frozen (don't thaw) to the cooled cherry mixture and then add vanilla, orange extract (if using) and tapioca. Mix gently until tapioca is absorbed into the berry mix.

  6. Scoop filling into shell. Place lattice or a full crust on top, if using. I generally bake my shapes/pastry letters separately. Place in freezer for about 15 minutes.

  7. While your pie is chilling, preheat oven to 400F. Remove pie from freezer and brush egg wash along crust sides and top or lattices, if using.
  8. Bake at 400F for 15-20 minutes then reduce heat to 350F and cook for another 30 minutes or so, or until filling is bubbling and crust is a nice golden brown. I use a pie shield (or tin foil around top crust sides) for the last 1/2 of baking if the crust is getting brown too quickly.
  9. Allow pie to cool for at least a couple of hours, at room temperature. If you slice into it before it's completely cooled, it'll be very soupy (I know from impatient experience haha). If desired, add some fresh cherries berries to the top of your pie when it has cooled. This adds a nice freshness to your pie. Add your pre-baked pastry toppers or just whip cream/ice cream. Enjoy!

Filed Under: East Coast, Food, Geeky Pies, road trip, Road Trips

Summer, Cherry Pie Cupcakes and 80s Flashback

August 27, 2017 by Pies & Prejudice 8 Comments

Hi guys, I hope you’re having a fabulous summer 🌞

How the heck are we almost at the end of August already? Seriously. It feels like it was only a few weeks ago that we ‘celebrated’ Summer Solstice. Yes those quotes are intentional because while the solstice marks the official start of summer and it’s the longest day of the year, it also means the days start getting shorter again. Wahhh! (I take my sunshine seriously, ya’ll).

We’re having the best summer ever here in Ottawa, though most of my local pals probably won’t agree (and might have even re-read that sentence to make sure they read it correctly haha). Sure, we’ve definitely had way too much rain but we haven’t had that much humidity this summer, thankfully. While I love me some summer heat (the hotter, the better), I just can’t stand the humidity. So this summer has been chock full of mostly hot days and cool nights, which is perfect to me. And my hair is very appreciative of the lack of humidity as well. Just sayin’. #frizzyhairproblems #the80scalledtheywanttheirhairback.

Who here likes cherry pie? I know, silliest question ever.

There’s something about a slice of fresh, homemade cherry pie that screams summer to me. But since you’ve probably already had lots of cherry pie already this summer (at least I hope you have), I thought I’d change it up and take cherry pie to a whole new level.

Behold: The Cherry Pie Cupcake. Heck yes!


(Recipe below this post)

A vanilla cupcake is slathered with a fresh cherry buttercream and then drizzled with cherry pie filling. It’s basically a combination of a cupcake and a slice of pie in one easy hand-held treat. How awesome is that? And, these cupcakes are actually quick & easy to make if you’ve already got some cherry pie filling leftover from your recent pie bake-a-thon.
What? You usually don’t bake one pie, let alone a bunch of them? Now who’s crazy? 🙂

Speaking of pie…this past July marked my very first PIE Anniversary! Yep, it was last year on Canada Day while making a Strawberry Balsamic pie for the festivities that I decided to forgo the usual lattice crust and do something a little different. I took advantage of the fact that the berry filling was red and created a Canadian flag out of the top pastry. It worked out deliciously well! Turns out there’s a whole other world beyond a lattice crust. Who knew? I was immediately hooked on pie design.

It didn’t take me long to start with the geeky pies, not too surprisingly (for those who know me, anyway). I made a Star Wars-themed pie for a friend’s birthday shortly after this one, and have made many a Superheroes/Star Trek/Star Wars pies in the past year. I’ve developed a Geeky Pie addiction, and not seeking any treatment for it whatsoever 🙂

This is one of my favourites: A Wonder Woman pie for the new movie– which came out this past Spring. It was my first time ‘drawing’ on pie crust and I had a lot of fun with it. Considering I hated art class in high school and I was pretty bad at it (worst marks, by far), my drawing isn’t all that terrible—surprisingly.

So, this year for Canada Day I made a fun pie to share with friends for our country’s 150th Birthday celebration.

Can you really get any more Canadian than a pie with a moose and a beaver in a canoe with a Timmies coffee? Probably not…


I also made a 4th of July pie for our lovely neighbours to the south. It’s a no-bake pie with fresh strawberries and blueberries and then I decorated it with pastry stars and whipped cream. It was deliciously American!

I also tried my hand at a braided pie crust. I’d been admiring all my lovely pie friends’ fantastic braided pies recently and just love the pretty effect. The braids especially stand out with a triple berry filling.


You guys might laugh at me but while I was standing in front of my pie with pastry strips all ready to braid, I drew a complete blank. Somehow I’d completely forgotten how to braid!! Crazy, right? As a kid I could braid with my eyes closed and probably in my sleep, too. My friends and I would braid each others’ hair all the time. I think it is (or was?) a rite of passage and a very popular pastime for a teenage girl. Mind you, I haven’t braided anyone’s hair (including my own) since 1989, so I guess it has been awhile. 

So I felt a bit silly entering ‘how to braid’ on the google machine but as soon as I watched the first 2 seconds of a Youtube video it all came back to me and I was braiding my pastry strips like a pro.

And then suddenly a huge wave of nostalgia swept over me and I was immediately transported to the summer of 1988 where I spent every. single. day at the pool hanging out with my friends. We’d sunbathe, swim, talk about boys, bugged the lifeguards (especially the ones we liked), AND braided each others’ hair. All whilst listening to the ballads of Corey Hart (swoon!) blaring from the radio. Ah, the good ole’ days. I miss the 80s…

Since I’m going down memory lane, and had also recently come across a few old photos, I thought I’d share a couple just for fun. Because who doesn’t like cheesy 80’s photos anyway, right?

This is my good friend Andrea and I sitting poolside while chatting and working on our tans. She was one of the lifeguards that I’d befriended and we kept in contact long after she moved to BC. She inspired me to become a lifeguard (a few years later) but the summers here at the pool just weren’t the same without her.


Would you believe that we actually slathered ourselves with BABY Oil in order to get the best tan ever? And sometimes (man, I can’t believe I’m actually admitting this), we even used Crisco Oil! I know….craZy! Thinking back, I can’t believe we actually thought that was a good idea (especially in this day and age with our sunscreen obsession) . But our tans were fabulous and we often smelled like french fries–which is never really a bad thing, right?

Don’t forget to also admire my “highlighted” hair. Anyone remember ‘Sun-in’? I know, orange is SO not my colour but it was all the rage back then. Oh and before we move on (to slightly embarrassing photo #2), don’t forget to check out my snazzy t-shirt I was wearing as well.

Yep, it’s Corey Hart! I got that shirt at his concert when he was here in Ottawa in the late 80s. It was my very first concert and I couldn’t talk for a few days afterward because of all the screaming we did. If you ever hear his version of ‘Rudolph the Red-Nosed Reindeer’ around the holidays, you may notice that it’s live. He recorded that song here in Ottawa, even though it was July. We were very confused when he started singing a Christmas song, but we still screamed for the entire duration of the song and if you listen closely, you might recognize my voice. Okay, maybe not… but I still enjoy hearing that song and remembering: ‘Wow, I was one of those crazy gals screaming at Corey while he’s singing Christmas songs in the middle of the freaking summer’ haha.

Here’s a photo of my girlfriends and I hanging out in the pool office. We were pretty fortunate the lifeguards liked us enough to let us in their private ‘office’. It seemed a lot more exciting at the time…


Oh and before you ask, that’s me on the far left with the football shirt and (almost) mullet. HA!  This was the very start of my tomboy phase. I hope you’re not laughing too hard. I thought I was cool at the time and I wore that shirt over my swim suit almost every day (when I wasn’t wearing my Corey Hart shirt, that is).

At this point you might be wondering…why did I even both to change my blog if the name is different but I’m still only sharing travel stuff and 80s pics? Well, my friends, I thought I’d ease you guys into the whole food blog thing before I start sharing a lot more of my recipes. I’m pretty sure you’ll come back again in hopes to see more cheey 80s photos though, right? hehe

Okay, here is the recipe for my Cherry Pie Cupcakes. Hope you guys enjoy them, and the rest of summer, too! I’ll be back with another recipe shortly. Pinky promise.

Dana xo


5 from 1 vote
Print

Cherry Pie Cupcakes

A cupcake and a pie in one! The perfect summer treat

Ingredients

For the Vanilla Cupcakes

  • 1 ½ cups Gluten-Free flour Packaged or your own mix
  • ¾ cup sugar
  • 1 ½ teaspoons baking powder
  • 1 teaspoon xanthan gum omit if it's in your flour mix
  • ½ teaspoon salt
  • ½ cup butter room temp
  • 2 large eggs room temp
  • ½ cup milk any--cow, almond, cashew, coconut etc.
  • 1 Tablespoon vanilla bean extract or reg vanilla

For the Cherry Pie Buttercream

  • 1 cup butter room temp
  • 2 cups powdered sugar or use more if you like your frosting sweet
  • 1 tablespoon or more whipping cream, coconut cream or milk
  • 1/2 tablespoon vanilla bean extract or regular vanilla
  • 1/3 cup Cherry Pie Filling- homemade or store-bought my simple recipe below

For the Cherry Pie Filling (if not using pre-made or store-bought filling)

  • 1 cup sweet or sour cherries if using frozen don't thaw first
  • 3 Tablespoons granulate sugar you can use brown or coconut sugar if preferred
  • 1 Tablespoon maple syrup or omit and add an extra tablespoon of your preferred sugar
  • 1 tsp cinnamon
  • 1 tablespoon tapioca starch
  • pinch sea salt
  • 1 teaspoon vanilla bean extract or regular vanilla

Instructions

  1. For the Cherry Pie Filling (if not using a pre-made or store bought pie filling):

    In large saucepan whisk together sugar, maple syrup (if using), cinnamon, sea salt, and tapioca. Add cherries (pitted first, if using fresh cherries) and mix into the sugar mixture. Cook over medium heat, stirring often. I often use a potato masher to break down the cherries while the sauce is cooking. When it begins to boil, cook for another minute or two until thickened. Remove from heat and add in vanilla. Use immediately or store in the fridge until ready to use for the buttercream and topping for the cupcakes.

For the Vanilla Cupcakes:

  1. Preheat oven to 350F. Line a cupcake pan with cupcake liners.
  2. In medium bowl add flour mix and whisk well (I always whisk gluten-free flour really well first), then add sugar, baking powder and salt.
  3. Add butter to the flour/sugar mixture and, with a hand mixer, beat on low-speed until thoroughly mixed. It will be crumb-like in texture, similar to coarse sand. Add in the eggs, one at a time, and mix until blended.
  4. Pour in the vanilla and then slowly add milk. Beat on medium for about a minute or so, until batter is fairly smooth (since GF flours don't contain gluten, you don't have to worry too much about over-mixing). If batter's too thick, gradually add an extra couple of teaspoons milk (you probably won't have to add extra milk if you're using reg vanilla extract). Batter should resemble a soft frosting when it comes together.
  5. Fill liners with batter to almost ¾ full. Bake for about 17-20 minutes--but I usually check them in about 15 minutes. When they're slightly golden and a toothpick inserted comes out clean, they're done. Allow them to cool completely.
  6. Frost with cherry buttercream (below) or your favourite frosting.

For the Frosting:

  1. Using a mixer, beat the butter on high for a minute or two.
  2. Turn speed to low and add confectioners sugar--but only a half cup at a time to gradually incorporate the sugar into the butter. Add salt.
  3. Slowly mix in vanilla extract and cream (or milk) and cherry pie filling and continue to beat on medium-high for a minute or two. After it comes together, increase speed to high and continue to beat for several more minutes (aim for 5 or more minutes, for best results).
  4. Frost cupcakes and drizzle each with reserved cherry pie filling.


Filed Under: 80s, family, Food, Geeky Pies, Ontario Road Trip, Road Trips, Writing

Spring Road Trip and Maple Blueberry Pie

June 13, 2017 by Pies & Prejudice 10 Comments

Hey guys, how is your spring going so far?

Spring is my (only) favourite season so I reallllly don’t want it zipping along so fast thankyouverymuch. If it were up to me, I’d be more than okay with spring all year-long. Just sayin’…

So in attempt to extend spring, I made this Maple Blueberry Pie. Can’t hurt, right? We just wrapped up our Tulip Festival not too long ago so I thought it’d be fun to add a pretty tulip. You’re probably surprised to see that there is no Pac-Man or a Superhero on this pie, right? (I get that a lot).

(scroll to the recipe below if you don’t want to read my ramblings—WHAT?? That’s crazy talk).

Thank you ALL so much for coming to check out my new blog, all the positive feedback and your messages and comments on my blog and social media. It’s super fantastic. I’m very happy to finally share more recipes with you guys, too (don’t worry, my geek theme is optional). Been a long time coming…

So far it’s been a fabulous Spring so far and, as always, it’s been absolutely gorgeous here in my hometown (Ottawa). Our world-famous Tulip Festival just ended (if you missed my post last spring, read about our tulips here) and I managed to get a few nice pics of the tulips again this year. If you’re coming to Ottawa for a visit, I strongly recommend planning your trip in May. This is thee best time to see the tulips in full bloom, and it’s usually too early for the hot, sticky weather as well (huge bonus!).

One thing is for sure, you’ll love our gorgeous, colourful tulips. The gardens are sure a sight to behold…

This also happens to be my ‘office’ as I also work outdoors. Not too shabby at all, right? #selfemployment #perks

I’ve also done quite a bit of travelling this spring as well…2 road trips already, and it’s not even summer yet (crazy, right?).

In April my guy and I went to Vermont for Maple Fest (post coming soon), and then during the May long weekend we went to Niagara-on-the-lake for the holiday and to also celebrate my birthday. We had a fabulous trip!

Since we haven’t been on a proper road trip since last summer, I knew I couldn’t wait until the Fall to get outta dodge. Desperation really starts to kick in when it’s been almost a month year since I last roadtrip’d (ha ha).

While I don’t travel nearly as much as I used to (hence the new blog theme), my guy’s work closed down for a couple of months (for renovations) this spring so we decided to sneak away for a bit. He figured it was a good time to use his summer vacation while it’s quieter (he still did occasional private parties in the basement). By travelling during this time, he now won’t have to burn any time off during the busy summer season. So we probably won’t be going anywhere ’til early Fall, when we’ll likely head to the East Coast visit his folks.

There is no better place to kick off the first unofficial weekend of Summer (Victoria Day weekend in May) than Niagara-on-the-Lake! This was my 3rd time visiting and it was more stunning than ever. I’m not at all surprised that NOTL is considered ‘The Most Beautiful Town in Canada’.
As soon as you get here, you won’t want to leave…


The town is chock full of tulips, lilacs and every other flower under the sun at this time of year.

I’m a complete lilac addict. It’s actually bordering on a problem because as soon as I come across them, I’ve got my face stuck in the flowers to give them a good sniff. I probably look crazy(er), but I just can’t stop. There has gotta be a LA (Lilacs Anonymous) group for this, right? Probably only runs for the month of May though….haha

And, of course, this is wine country so you could spend all your time going from one vineyard to the other, and sipping a glass of wine on a garden patio in between tours.

Even if you don’t like wine, the scenery alone is worth the visit here


We did a few wine tours, a couple of brewery tours and ate LOADS of amazing food as well.


There are also loads of scenic areas for bike rides and nice walks.

I’ll be doing a full recap post on our Niagara adventure soon! If you haven’t been there yet, hopefully I can encourage you to check it out. Just a warning though….this place can be completely addicting (almost as much as chocolate…or lilacs)

We also did the boat trip under Niagara Falls, so you’re guaranteed to see some fun pics in my next post. Let’s just say I would have been LESS soaked if I’ve gone over the falls in the barrel like I was hoping to do (silly rules/by-law restrictions).

BTW, if anyone from the Niagara Falls Tourism Board is reading this, you guys really need to hire Superman to give free rides over the Falls. If that doesn’t boost tourist to the area, I don’t know what else will (um, not that you need any help really….the place has been packed anytime I’ve been there).
The movie Superman (the 2nd one, actually) is one of my favourite flicks, so I may be biased. Anyone else think of Lois and Clark while visiting the Falls?…. or am I just crazy? (um, maybe don’t answer that question).

Here’s a sneak peek into our fun at the Falls. This is right before Billy threw me over the railing (I only wish I were kidding :D).

So…. let’s get down to the most important thing about this post (well, besides Superman)… how about a PIE?

Oh look at that, I’ve combined pie AND superman. Whoops. How did that happen? It’s a bird…it’s a plane…no, it’s a….. BLUEBERRY PIE?


*The Superman logo is optional, but it will definitely win you points with your geek friends (like me! haha).

This is one of my new favourite pies. It’s a baked pie but with added fresh berries on top  after it’s cooled. Throwing on some fresh berries is a little easier if you’re not using a top crust, of course. I usually make fancy pastry shapes or words and place them on top afterward. If you decide to do a top lattice, just throw a few berries around the lattice strips.

I’ve also used a combo of other berries to make this pie. You can just use whatever you like or have on hand. Blueberry and cherries are a fabulous mix and a bit different from the usual combos–that’s what I used in the Superman pie (above). Like most pies, the berries are fairly versatile.
So… let’s get on with our pie baking fun, shall we?

(I’m working on my recipe format, please bear with me! thanks 🙂 

Print

Maple Blueberry Pie (baked & fresh)

A delicious baked blueberry (or a combo of berries) pie with fresh berries thrown on top for a more 'fresh' taste during off-season. So yummy and versatile, too.

Course Dessert
Prep Time 1 minute
Servings 6
Author Dana, Pies & Prejudice

Ingredients

CRUST

Pie Crust for a single 9" pie (*Double if you want a top crust, lattice or shapes)

  • 1 1/2 cups GF Flour (your own mix, Bob's GF flour, cup4cup etc)
  • 1 teaspoon sugar
  • 1/2 teaspoon salt
  • *pinch of cinnamon (optional but adds a really nice flavour)
  • 1/2 cup cold/frozen butter , grated
  • 1 tablespoon lemon juice or apple cider vinegar
  • 1 egg
  • 2-4 tablespoons very cold water or milk (any)
  • *Egg Wash to brush crust before baking *optional:
  • 1 egg yolk + 1 teaspoon water or milk/cream

For the Filling

  • 6 cups fresh or frozen blueberries (do not thaw if using frozen) or use a mix of different berries
  • 1 small apple , grated (my favourite is Granny Smith or Golden Delicious)
  • 2 teaspoons fresh lemon juice
  • 1/2 cup granulated sugar
  • 1/4 cup brown or coconut sugar (you can use all-- 3/4 cup--coconut sugar if preferred)
  • 3 tablespoons maple syrup
  • 2 teaspoons cinnamon
  • 3 tablespoons tapioca starch/flour (or use cornstarch, if preferred)
  • pinch of sea salt
  • 1/2 tablespoons vanilla bean extract , or regular vanilla extract is fine
  • 3 tablespoons butter , cut into pieces

Instructions

DIRECTIONS

For the Crust (if using storebought or your own, go to the next step)

  1. In large bowl combine the flour, sugar, salt, and cinnamon. Add cold, grated butter and mix lightly until combined. Add in lemon juice or apple cider vinegar and egg and mix together. Gradually add in cold water or milk, about a tablespoon at a time until the mixture looks dough-y and sticks together (I often do it gradually because it's easy to go overboard and then the dough its too wet). Add in a bit more flour if that happen.

    Roll into a flat disc and put in freezer for a bit to let the dough relax and for the butter to get 'cold' again (helps with flakiness) while you prepare the filling.

For the Filling:

  1.  set aside about 1 cup of berries to put on top of pie after it's cooked


  2. Place 2 12 cups blueberries (or half/half if you are doing a combined blueberry/cherry pie) in saucepan over medium heat and cook until the berries half broken down and they become saucy. I use a fork or potato masher to help break them down. The mixture should reduce by approximately a third to a half, usually in about 10 minutes or so. Allow to cool slightly. *While this is not a mandatory step, I always do this because it takes some of the 'water' out of the filling and adds a condensed sauce to the pie filling. Skip this step if you just want to cut time and use all 5 cups in the next step.

  3. Grate apple and squeeze some of the moisture out with a cloth or paper towel.
  4. In a large bowl add the remaining berries 2 1/2 cups (or 5 1/2 cups if skipping the step above), grated apple, lemon juice, sugars, maple syrup, cinnamon, salt, tapioca starch, salt and vanilla. Add your cooked berry filling, if using (from step 1). Set aside.


  5. Roll out pie dough and put into a 9" pie plate. Scoop filling into shell. Scatter the 3 tablespoons of (cold) pieces of butter on top of filling. Place lattice or a full crust on top, if using. I generally bake my shapes/pastry letters separately. Place in freezer for about 15 minutes.
  6. While your pie is chilling, preheat oven to 400F. Remove pie from freezer and brush egg wash along crust sides and top or lattices, if using.

    Bake at 400F for 15-20 minutes then reduce heat to 350F and cook for another 30 minutes or so, or until filling is bubbling and crust is a nice golden brown. I use a pie shield (or tin foil around top crust sides) for the last 1/2 of baking if the crust is getting brown too quickly.

    Allow pie to cool for at least an hour or two, at room temperature. If desired, add some fresh berries to the top of your pie when it has cooled. This adds a nice freshness to your pie. Enjoy!

Recipe Notes


As always, thanks for stopping by lovelies! I’ll be sharing my Niagara adventure and a butterscotch pie on my next post. Stay tuned 😀

Dana xo

Filed Under: family, Food, Food Network, Geeky Pies, Ontario Road Trip, road trip, Road Trips, Writing

Back to the Future Day, the Ride that I missed in Florida & a McFly/Doc PIE!

October 21, 2015 by Pies & Prejudice 8 Comments

 (Geek Alert).  Great Scott, it’s here!

It was on this day…..October 21, 2015, that Marty McFly and Doc Brown went ‘back’ in time to the future and they arrived in a very different version of their hometown of ‘Hill Valley’….complete with Hoverboards and flying cars zipping all over the place.

Welcome to the Future er, I mean the present! (update: now the past)

This movie is no longer about the future, boys n’ girls. Yep, now when you watch it, Doc and Marty will be going to the past (well, our past). Man, that’s heavy.

“Heavy! There’s that word again. Why are things so heavy in the future?Is there something wrong with the earth’s gravitational pull?”

If you were a kid/teen in the 80s, like me (but seeing as I’m still only 25, I’m not sure how that’s even possible?) you probably loved this movie and maybe even saw it in the theatre, too. I’d like to say it’s timeless, but given that it IS a time-travel movie, that doesn’t make a lot of sense. Moving on….

It’s definitely my all-time favourite movie. Who wouldn’t want to go back (or forward) in time and see your parents as teenagers or your kids a heck of a lot older? Exactly.

And it’s even more fun when you can travel in time with these guys. Here we are stopping to take a quick pic before getting into the DeLorean.

12002078_10156125808970601_5386353652667604753_n

Now this is what I call a throwback…uh, er….back to the future? Or the past? Or maybe this is the present. Confused yet? hehe

I was in High School not born for another 25 years when the second movie came out. After seeing the original, we couldn’t wait to see the sequel (three years was a long wait). It was fun to see them go into the future instead this time around. While watching it for the first time (back in 1989), we couldn’t really critique their rendition of the future since 2015 was nearly 25 years away. Who knew Hoverboards and self-tying laces weren’t actually going to be all-the-rage now?

Today we can (obviously) see what they guessed right (and wrong) in their take of 2015. There are several great articles written about it like this one  and this one , in case you’re interested in reading more. If you’re a BTTF fanatic like me, they’re definitely worth checking out.

I can’t believe it was 30 years ago (32 now) that Doc and Marty punched ‘2015’ into their time-machine and headed to the future. I still love this trilogy just as much today as I did back then and I even loved the 3rd one, too. But since I’m a Wild West fanatic, that probably doesn’t seem too surprising for those who know me.

There are so many things about this movie that makes it a great story: time-travel, great characters played by totally awesome actors (I LOVE Christopher Lloyd– but Crispin Glover and Michael J Fox are great, too), romance, tons of action, and, of course—the villain ‘Biff’ (make like a tree and leaf!). And, it has the best score/soundtrack ever. 

Every time I hear the theme music for this movie I feel like I’m getting ready to hop into the DeLorean to go back in time to 1955 as well. Although I think 1985 would be better because I can go back to my childhood and do things a little differently. I would also go to the location of where the movie was filmed (in California) to give the producers some insight into what they should do for 2015. Then, many years later, they’ll wonder how this chick they met back in 1985 managed to predict everything right. Are you telling me you time-travelled in a Delorean all the way from 2015 to tell us how to film the movie?

But seriously, while I LOVE anything time-travel related, the ‘Scully’ in me (yep–X Files fan as well) doesn’t believe time travel is possible. Not yet, anyway.

Over the years I’ve heard rumours about a 4th movie or—worse–a re-make !?? Noooooo!  Thankfully none have come to fruition at this point. While it’d be interesting to see another take on the story, a remake of this would probably be awful. So leave well enough alone, Hollywood.

Without further ado….let’s add a bit of a time-travel element to this story, shall we?

It was April 2007 and I was heading to Florida for the first time ever with my good friend Al. I was SO excited because we were going to Universal Studios and I couldn’t wait to finally get to check out the Back to the Future ride that I’d been hearing about for years.

danaalflorida

Or not.

Guess what I discovered when we arrived at the Back to the Future Ride? A closed sign, and not just ‘temporarily’, either. The ride was shut down & boarded up and another sign announced: ‘Coming soon: The Simpsons Ride.

NOOOOOOOO! Apparently I looked like a 4-year old who’d just dropped her favourite ice cream cone. That’s exactly how I felt.

Seriously, though? The ride has been around for almost 15 years at the time (this trip to Florida was a decade ago, so now we’re talking 25 years ago since the ride had been there). It opened its doors in Universal Studios, Florida in 1991.

The worst part? I missed it by A FEW DAYS!! Oh yes, you read that right. I couldn’t have had worse timing if I tried. It closed down permanently on March 30th, 2007 and we arrived April 5th, 2007. So my only option was a time machine so I can go back to, say–a week earlier–to do the BTTF ride. 

Lesson learned. If that didn’t teach me to see something sooner than later (be it a place, ride, event etc) before it’s gone, I don’t know what else could.

At the very least, they did keep the Gift Shop open so we could check out some fun BTTF-themed clothes and gadgets.

Buddy test 1 578
I’m glad I got to see the store, at least, as it was gone when I came back to Florida a couple years later.

They also had actors, er, I mean the real Doc Brown and Marty McFly walking around chatting with everyone. Doc is such a nice guy, even if he is slightly eccentric. He hasn’t aged much since 1989, either.

Buddy test 1 5812

And the DeLorean was still on display. The real one too, not just a replica. I think I’m gonna take this for a spin. Maybe even drive it home? Wonder if they’ll notice it missing? hehe

IMG_4616

Here’s the Jules Verne train from the 3rd movie.

backfuturetrain

IMG_4612

These cheered me up slightly and almost made up for missing the ride….*Almost*. I’m still upset, but I eventually got over it. If you ever had the pleasure of experiencing the Back to the Future ride in Orlando (lucky duck), I’d LOVE to hear about it. Let me know in the comments, I’ll try not to cry 😀

When I returned to Universal a few years later, this is what replaced the Back to the Future ride:

IMG_4461

The Simpson’s ride was actually pretty cool. It’s a roller-coaster simulator/3-D ride, and even my dad (who hated roller-coasters) enjoyed it when we were here together. While it was fun, it ain’t no Back to the Future Ride! (Harumph).

They also had this guy wandering around pretending he was the Doc….on a bike!???  He looked 30 years old… at most. Seriously? For the DOC?  The cosplay actors whom I met a few years earlier were much more realistic.

IMG_8668

Update: While this post was written on the actual day when Marty & the Doc went into the future: Oct 21, 2015, now that I am baking themed pies, of course I had to make a Back to the Future pie for the 2 year anniversary.  

It’s a Spiced Cherry Pie with Cardamon, Cinnamon and brown butter—and a Delorean, Marty and the Doc.  Great Scott, this is yummy.


Happy BTTF day everyone!  Hope your week is filled with pie, time-travel and maybe even a road trip?

Roads? Where we’re going we don’t need roads!

Dana xo (your friendly Canadian Geek)

Filed Under: 80s, East Coast, family, Food, friends, geek, Geeky Pies, road trip Tagged With: Back to the Future, Back to the Future 2015, Back to the Future Ride, Marty McFly

Wine, Horses & Southern History: The Belle Meade Plantation (Nashville)

May 24, 2014 by Pies & Prejudice


I’m in love with Nashville.

Generally I’m not overly keen on large cities, but I find Nashville more like a small town. I’m guessing it’s the laid-back, country-living sorta vibe. And I find the people here ridiculously friendly.

IMG_5748

The food ’round these parts is just incredible too. It’s no wonder they call southern cooking ‘soul food’. I’m going to have to make another trip down here again just to try every restaurant since I’m only getting a few meals in this time around.

Like most first-timers, we’re seeing all the popular touristy spots here in Nashville. We did a fantastic tour of The Ryman yesterday which we both really loved. Even if you don’t like country music, the history and the building itself is worth a visit.

Today we’re off to see another popular tourist attraction chock full of history: the Belle Meade Plantation.

Since the plantation used to occupy such a big part of the city, we figured it was worth a visit. I knew I’d have a tough time with the whole slavery part of the tour, but the plantation itself sounded spectacular. The fact that there is a winery there may or may not have helped sway our decision to check it out (hehe!)

First though, it’s time for breakfast. We decided on a place called Edgehill Cafe which I’d heard about from one of my favourite bloggers (Kristin of Camels and Chocolate).  She was raving about it and frequents this place often. And since she lives here in Nashville, I figured you really can’t go wrong with a local’s suggestion.

IMG_5084

She was right. This cafe is probably one of the funkiest cafe’s I’ve ever been to (and being a coffee fiend, I’ve tried many in my world travels). The decor and furnishings were a mix of old wood and industrial decor, with a bit of flea market chic going on as well.

And the chairs were upholstered with coffee bean sacks. How cool is that? 

IMG_5115

I wanted to take home this table made out of reclaimed wood. I wonder if anyone would notice me taking it out the front door?

IMG_5097

And the coffee was great too. No wonder so many locals call this place the ‘Best Coffee House in Nashville’.

When I asked if they had any gluten-free goodies, I nearly jumped for joy when the woman behind the counter said they had gluten-free pancakes. Woo hoo! Since it’s so hard to get anything gluten-free on the road, I could barely contain my excitement.


IMG_5106 They were absolutely scrumptious, and some of the best pancakes I’ve ever had (gluten-free, or not). Mnnn…

Cowboy had a scrumptious breakfast sandwich which was oozing with deliciousness as he bit into it. It was chock full of fried egg, sausage and spinach. He said it was fantastic. It sure looked incredibly tasty.

IMG_5109


IMG_5110

If we had time, I could hang out here all afternoon.

IMG_5101

After a hearty breakfast, we were ready to head to the Plantation. Since it was just down the road it didn’t take us too long to get there.

IMG_5295

Belle Meade is a 30-acre historical plantation just outside downtown Nashville. This quintessential Antebellum home gained its fame in 1853 with thoroughbred horse racing. 


IMG_5173

In fact, many of the top racing horses such as Seabiscuit and Secretariat can be traced back to the horses from Belle Meade. (And interesting side note: this place tied into our road trip perfectly as we’d just been to the home of the Kentucky Derbry (read about our adventure) a few days ago. We didn’t plan it, it was just a neat coincidence).

…

Read More »

Filed Under: Geeky Pies

« Previous Page

Copyright © 2026 · Foodie Pro Theme by Shay Bocks · Built on the Genesis Framework · Powered by WordPress